Difference between revisions of "Universal WiFi Throttle - NCE Macro Control"
m |
(updated link to gitub) |
||
| (One intermediate revision by one other user not shown) | |||
| Line 18: | Line 18: | ||
JMRI supports the ability to activate Macros through a computer interface with an NCE command station. However, WiThrottle Protocol does not provide direct support for NCE Macro activation. These instructions describe a method of JMRI configuration that uses JMRI Routes and Logix in order to activate NCE Macros. The WiThrottle Protocol does provide direct support for JMRI Routes, so we have implemented this workaround. | JMRI supports the ability to activate Macros through a computer interface with an NCE command station. However, WiThrottle Protocol does not provide direct support for NCE Macro activation. These instructions describe a method of JMRI configuration that uses JMRI Routes and Logix in order to activate NCE Macros. The WiThrottle Protocol does provide direct support for JMRI Routes, so we have implemented this workaround. | ||
| − | The TCS [[UWT-100]] throttle supports JMRI Route activation when using the WiThrottle Protocol. This technique can also be used with the WiThrottle<sup>TM</sup> and Engine Driver smart phone apps. To get started, follow the link below to download the necessary XML file:<br />[https:// | + | The TCS [[UWT-100]] throttle supports JMRI Route activation when using the WiThrottle Protocol. This technique can also be used with the WiThrottle<sup>TM</sup> and Engine Driver smart phone apps. To get started, follow the link below to download the necessary XML file:<br />[https://github.com/TCSDCC/Public-Software-Resources/tree/master/JMRI%20Create%20NCE%20Macro%20Routes JmriNceAddMacroRoutes.xml] |
It is strongly suggested to put this file into a folder where you can easily access it using JMRI's file browser. | It is strongly suggested to put this file into a folder where you can easily access it using JMRI's file browser. | ||
| Line 84: | Line 84: | ||
#Enable/Activate the Logix instance. | #Enable/Activate the Logix instance. | ||
| − | [[Category:Technical Support]] | + | [[Category:Technical Support]] |
| + | [[Category:Universal WiFi Throttle]] | ||
Latest revision as of 21:45, 5 March 2024
Contents
Setting Up NCE Macros Using JMRI
NCE Command Stations support a feature called Macros. A Macro is a sequence of actions that happen based on a single user command. Macros can be used for, among other things, sending both locomotive and accessory commands.
| Command Station | Macros Supported |
| PowerCab | 16 |
| SB3a | 16 |
| PowerPro CS02 | 256 |
JMRI supports the ability to activate Macros through a computer interface with an NCE command station. However, WiThrottle Protocol does not provide direct support for NCE Macro activation. These instructions describe a method of JMRI configuration that uses JMRI Routes and Logix in order to activate NCE Macros. The WiThrottle Protocol does provide direct support for JMRI Routes, so we have implemented this workaround.
The TCS UWT-100 throttle supports JMRI Route activation when using the WiThrottle Protocol. This technique can also be used with the WiThrottleTM and Engine Driver smart phone apps. To get started, follow the link below to download the necessary XML file:
JmriNceAddMacroRoutes.xml
It is strongly suggested to put this file into a folder where you can easily access it using JMRI's file browser.
Applying Configuration
If you have an existing configuration, like turnouts or panels in JMRI, use these steps to add the NCE macros to it:
- Start JMRI and load your existing configuration file as usual. You should be seeing your turnouts and your panels now.
- In the PanelPro window select Panels > Open Panels…
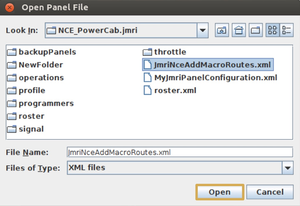
- Find where you have the JmriNceAddMacroRoutes.xml file saved, select it, and click Open. JMRI will now add the Routes and supporting objects for NCE macros from the JmriNceAddMacroRoutes.xml file into your configuration.
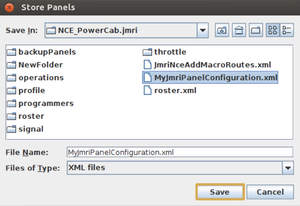
- Save your existing configuration as if you had just added a new turnout to your layout in the Turnout Table. Caution! Saving over an existing configuration could result in a loss of data. It is a good idea to make a backup of an existing configuration before overwriting it, just in case.


You only need to save the configuration one time.
If you do NOT have any regular configuration, then you only need the JmriNceAddMacroRoutes.xml file. Every time you start JMRI, you should click Panels > Open Panels… from the PanelPro window, and select JmriNceAddMacroRoutes.xml. The Macros will be loaded into JMRI. You can make this happen automatically at every start:
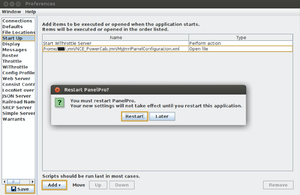
- In PanelPro, select the Edit menu item and choose Preferences.
- On the left hand side of the Preferences window, choose Start Up.
- Click the Add drop down button and choose Open file…
- Browse to and select JmriNceAddMacroRoutes.xml and click on the Open button.
- In the lower left hand corner of the Preferences window, click Save. When asked, choose to restart PanelPro.

Customization
User Names
The Routes that were imported for NCE macros can have their User Name customized.
- From the main JMRI PanelPro window, select the Tools menu, choose Tables and then Routes.
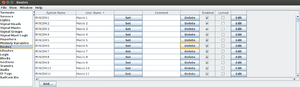
- Scroll and select the line representing the NCE Macro, click into the User Name field on that line, and enter the text you would like to show up in the Throttle’s Select Accessory Screen.

Do not forget to save your configuration if you changed any User Names.
Removing Unneeded Entries
The JmriNceAddMacroRoutes.xml file contains configuration for 256 NCE Macros, the maximum supported by any NCE system. To remove clutter in the JMRI Routes table and the Throttle’s Select Accessory Screen, unused Macros (Routes) can be removed:
- From the main JMRI PanelPro window, select the Tools menu, choose Tables and then Routes.
- Press the Delete button for any Macro (Route) you wish to remove.
Do not forget to save the new configuration when finished.
Adding Removed Entries Again
To replace lost or deleted macros, you can perform the steps in the “Applying Configuration” section again; however, when you load JmriNceAddMacroRoutes.xml again, you will get error messages from JMRI that certain objects already exist. Click the “Do not show this message again for this session” checkbox and dismiss the error. The Routes you had deleted will now be repopulated.
Do not forget to save your configuration afterwards.
Theory of Operation
This content of this section is highly technical and not relevant to most users.
The JmriNceAddMacroRoutes.xml configuration is generated using a Python script called JmriCreateNceMacroRoutes.py (Right click on link and select "save link as") . This script is provided in source form for advanced users who wish to make further customizations. The script is provided under a GPL version 2 license.
JmriCreateNceMacroRoutes.py performs the following steps:
- Create a Logix instance called IXNCEM.
- For each Macro starting with 0 and going up to NUM_MACROS:
- Create a Sensor called IS:NCEM:<Macro #>.
- Create a Route called IR:NCEM:<Macro #>.
- Create a Conditional called IXNCEMC<Macro #>.
- Attach the Sensor activation to the Route activation.
- Attach the Conditional to the Logix instance.
- Attach the Sensor to the Conditional as a Conditional Variable.
- Attach a Conditional Action to the Conditional to reset (inactivate) the sensor after a short delay.
- Attach a Conditional Action to the Conditional to execute a Jython script:
- The Jython script provides the business logic to send activate an NCE Macro
- The Jython script is provided as a string embedded in the JmriCreateNceMacroRoutes.py source code
- Enable/Activate the Logix instance.