B-106: Difference between revisions
(major revisions done. needs review.) |
(added configuration options CV table) |
||
| Line 45: | Line 45: | ||
==Specifications== | ==Specifications== | ||
=== DCC System === | ===DCC System=== | ||
* 6 Ampere continuous current rating with soft start, configurable current limit and load reporting | *6 Ampere continuous current rating with soft start, configurable current limit and load reporting | ||
* Generates RailCom® cutout | *Generates RailCom® cutout | ||
* Integrated RailCom® detector on Mainline, with global transmission for compatible Command Stations | *Integrated RailCom® detector on Mainline, with global transmission for compatible Command Stations | ||
* Can be used with non-TCS Command Stations | *Can be used with non-TCS Command Stations | ||
=== NMRA Layout Command Control (LCC) Features === | ===NMRA Layout Command Control (LCC) Features=== | ||
* Dual RJ-45 jack for LCC communication through CAN-bus | *Dual RJ-45 jack for LCC communication through CAN-bus | ||
* Diagnostic information and Status feedback over LCC | *Diagnostic information and Status feedback over LCC | ||
* Plain English configuration via CV Programming or a PC | *Plain English configuration via CV Programming or a PC | ||
* Global RailCom® transmissions over LCC for supporting Command Stations | *Global RailCom® transmissions over LCC for supporting Command Stations | ||
* Firmware Update via LCC interface | *Firmware Update via LCC interface | ||
==Physical Overview== | ==Physical Overview== | ||
| Line 71: | Line 71: | ||
The purpose of the LEDs is described in detail in the section below. | The purpose of the LEDs is described in detail in the section Status LEDs Section below. | ||
==Status | == Changing Configuration Settings of the B-106 == | ||
=== Configuration Using DCC Programming on the Main === | |||
The B-106 supports configuration using standard DCC Program-On-the-Main (POM/Ops) commands sent to CV7 of any DCC locomotive address. CV7 is “Read-Only” for DCC decoders, and will not be affected by values written to it. First, write a value of 50 to CV7. Within the next 15 seconds, write the second value to CV7 which represents the configuration option, using the table below: | |||
{| class="wikitable" | |||
|+B-106 Configuration Options | |||
!Write to CV | |||
!Effect | |||
|- | |||
|CV7=50; CV7=1 | |||
|Set current limit to 1A | |||
|- | |||
|CV7=50; CV7=2 | |||
|Set current limit to 2A | |||
|- | |||
|CV7=50; CV7=3 | |||
|Set current limit to 3A | |||
|- | |||
|CV7=50; CV7=4 | |||
|Set current limit to 4A | |||
|- | |||
|CV7=50; CV7=5 | |||
|Set current limit to 5A | |||
|- | |||
|CV7=50; CV7=6 | |||
|Set current limit to 6A | |||
|- | |||
|CV7=50; CV7=7 | |||
|Set current limit to 6.25A (Max; Default) | |||
|- | |||
|CV7=50; CV7=92 | |||
|Disable RailCom® cut-out | |||
|- | |||
|CV7=50; CV7=93 | |||
|Enable RailCom® cut-out (default) | |||
|- | |||
|CV7=50; CV7=99 | |||
|Return to factory default settings | |||
(Allocates new unique LCC Event ID’s) | |||
|- | |||
| | |||
| | |||
|} | |||
After programming, all of the Status LED’s will briefly turn OFF and then back ON before returning to their normal operation. A Factory Reset will result in an automatic reboot of the B-106. | |||
=== Configuration Using LCC === | |||
All of these settings and more can be configured over the LCC bus utilizing standard LCC configuration tools, such as JMRI® PanelPro. | |||
==Status LEDs== | |||
The B-106 includes a total of five LEDs for providing information about the device’s status. The LEDs are also used during configuration as described in the Push Button Configuration section. Additionally, both the user and TCS support can use these LEDs in order to Troubleshoot issues. | The B-106 includes a total of five LEDs for providing information about the device’s status. The LEDs are also used during configuration as described in the Push Button Configuration section. Additionally, both the user and TCS support can use these LEDs in order to Troubleshoot issues. | ||
On one side of the B-106 there is a single red Power LED. This LED is constantly on whenever the B-106 has incoming power. On the opposite side, the dual RJ-45 LCC connector has the remaining four LEDs in a Yellow, Green, Yellow, Green pattern as shown below: | On one side of the B-106 there is a single red Power LED. This LED is constantly on whenever the B-106 has incoming power. On the opposite side, the dual RJ-45 LCC connector has the remaining four LEDs in a Yellow, Green, Yellow, Green pattern as shown below: | ||
[[File:Booster Status LEDs R0.png|alt=|center|thumb|489x489px|B-106 Status | [[File:Booster Status LEDs R0.png|alt=|center|thumb|489x489px|B-106 Status LEDs]] | ||
===Normal Operation=== | ===Normal Operation=== | ||
Latest revision as of 04:33, 26 October 2024
Lua error: Internal error: The interpreter exited with status 1.
The B-106 is an intelligently-designed DCC Auxiliary Booster with LCC integration as well as a built-in RailCom® detector. Thoughtfully designed to outperform in every area, the B-106 is the perfect for layout builders or renovators looking for a highly-capable DCC Booster with the latest and greatest technology available.
The B-106 features "Soft Start" for starting up large blocks with lots of locomotives, as well as configurable short circuit detection for the mainline track output which decreases the likelihood of burning up fouled decoders.
Also included in the package with the B-106 is the Power Supply and AC cord, as well as a detachable track power connector.
| This product has two Power Supply options: 12 Volts or 15 Volts
Click on one of the options below to shop: | ||
| 12V Power Supply | 15V Power Supply | |
Power Supply Selection: When selecting a power supply voltage, you choice should depend on two factors: 1) Modeling Scale 2) Maximum loco speed. For smaller scales such as Z, N, TT, etc., the 12V supply is recommended. The 12V supply is also acceptable for larger scales such as HO; however, if you like to run your trains at higher speeds the 15V supply increases the maximum voltage available to the motor, allowing your models to reach higher top speeds. This is particularly beneficial to modelers of bullet trains and other high-speed passenger services. Both power supply options are rated to supply the B-106 with up to 6 Amperes of continuous current all day long!
Small Package; Big Power
The B-106 is not only feature-packed, but also highly capable with plenty of horsepower for your railroad. The B-106 has a user-configurable short circuit protection algorithm and current limit up to 6 Amperes. Unlike many systems on the market, when we say "6 Amps continuous" we mean it! The B-106 can supply up to 6 Amperes of current to your railroad all day and all night long.
Global RailCom® Transmission
The B-106 has the ability to add a RailCom cutout onto the rails for use with RailCom command stations such as the B-106. The B-106 also features a "global" RailCom transmitter which operates over LCC to send back RailCom data from within its own district to the command station.
Multiple Connection Modes
The B-106 can be used in conjunction with a CS-105 command station, or adapted for use with any other DCC command station with the "Booster Adapter."
Full-Text Menus
The settings of the B-106 can be accessed through a CV programming or JMRI. Configuration menus and options are listed in full words and phrases. No guess work or manuals needed!
Specifications
DCC System
- 6 Ampere continuous current rating with soft start, configurable current limit and load reporting
- Generates RailCom® cutout
- Integrated RailCom® detector on Mainline, with global transmission for compatible Command Stations
- Can be used with non-TCS Command Stations
NMRA Layout Command Control (LCC) Features
- Dual RJ-45 jack for LCC communication through CAN-bus
- Diagnostic information and Status feedback over LCC
- Plain English configuration via CV Programming or a PC
- Global RailCom® transmissions over LCC for supporting Command Stations
- Firmware Update via LCC interface
Physical Overview
The B-106 features a case design which is symmetrical in nature, meaning that it can be mounted or oriented in just about any way you could possibly need to, even vertically! TCS does advise against having any obstruction on the vented sides of the case in order to allow for passive air flow, however. We will be referring to these vented sides as Side A and Side B, since what the “back” and “front” are are up to you.
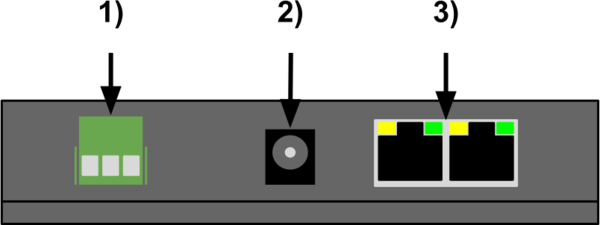
Side A features: 1) Green 3-pin connector with detachable screw terminal 2) DC Power input jack 3) Dual RJ-45 LCC connector with four LEDs

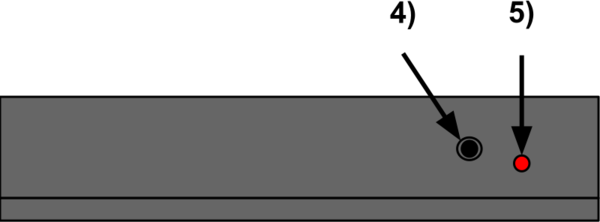
Side B features: 4) Tactile push button 5) Single red LED.

The purpose of the LEDs is described in detail in the section Status LEDs Section below.
Changing Configuration Settings of the B-106
Configuration Using DCC Programming on the Main
The B-106 supports configuration using standard DCC Program-On-the-Main (POM/Ops) commands sent to CV7 of any DCC locomotive address. CV7 is “Read-Only” for DCC decoders, and will not be affected by values written to it. First, write a value of 50 to CV7. Within the next 15 seconds, write the second value to CV7 which represents the configuration option, using the table below:
| Write to CV | Effect |
|---|---|
| CV7=50; CV7=1 | Set current limit to 1A |
| CV7=50; CV7=2 | Set current limit to 2A |
| CV7=50; CV7=3 | Set current limit to 3A |
| CV7=50; CV7=4 | Set current limit to 4A |
| CV7=50; CV7=5 | Set current limit to 5A |
| CV7=50; CV7=6 | Set current limit to 6A |
| CV7=50; CV7=7 | Set current limit to 6.25A (Max; Default) |
| CV7=50; CV7=92 | Disable RailCom® cut-out |
| CV7=50; CV7=93 | Enable RailCom® cut-out (default) |
| CV7=50; CV7=99 | Return to factory default settings
(Allocates new unique LCC Event ID’s) |
After programming, all of the Status LED’s will briefly turn OFF and then back ON before returning to their normal operation. A Factory Reset will result in an automatic reboot of the B-106.
Configuration Using LCC
All of these settings and more can be configured over the LCC bus utilizing standard LCC configuration tools, such as JMRI® PanelPro.
Status LEDs
The B-106 includes a total of five LEDs for providing information about the device’s status. The LEDs are also used during configuration as described in the Push Button Configuration section. Additionally, both the user and TCS support can use these LEDs in order to Troubleshoot issues.
On one side of the B-106 there is a single red Power LED. This LED is constantly on whenever the B-106 has incoming power. On the opposite side, the dual RJ-45 LCC connector has the remaining four LEDs in a Yellow, Green, Yellow, Green pattern as shown below:

Normal Operation
| (From L to R) | Booster |
| LED 1 - Yellow
closest to the barrel jack |
Track Power
- solid on: track power on - solid off: track power off - fast blink, short circuit - slow blink: thermal overload |
| LED 2 - Green | CAN Active and LCC Activity
- solid on: CAN bus connected - solid off: CAN bus disconnected - blink: LCC activity (TX) |
| LED 3 - Yellow | Incoming DCC signal
- on DCC signal present - off DCC signal absent |
| LED 4 - Green | "Identify" LED
Press button [in JMRI] - LED comes on for 30 seconds to help identify this booster within an array of boosters. |
| LED 4 - Green
(upon crash) |
Blink Codes |
Bootloader
When the device is in Firmware Upgrade mode, LED 1 and LED 4 are alternately blinking like a grade crossing. LED 2 (LCC) and LED 3 (WiFi) are operating as normal.
Track Output
The DCC track output of the B-106 is designed for a continuous capacity of 6 Amps. This output is also compatible with the Märklin/Motorola protocol, and both protocols can be in use at the same time. The B-106 may be used to power any scale, but it is important to ensure that you are capable of powering your layout with the system. Modern N and HO scale locomotive motors are typically very efficient, even under load. Below, we have included a table for some examples of typical load values which can help you determine how many locomotives the B-106 is capable of supplying by itself:
| Locomotive Type | Typical Current Draw | Locomotive Max Count (Typical) |
| (All Scales) Idle/Stationary | 0.05A - 0.10A | 60 - 120 |
| Idle/Stationary with sound | 0.15A - 0.25A | 24 - 40 |
| N scale under load | 0.15A - 0.35A | 17 - 40 |
| N scale under load with sound | 0.30A - 0.50A | 12 - 20 |
| HO scale under load | 0.25A - 0.50A | 12 - 24 |
| HO scale under load with sound | 0.35A - 0.65A | 9 - 20 |
Note that the values in the table above are very generalized. Your results will vary for your own locomotives. Some older HO and N scale locomotives used much less efficient motors and can subsequently draw more current. The built in booster has the ability to measure track current, and this feature can be used to characterize a given locomotive for its typical current draw.
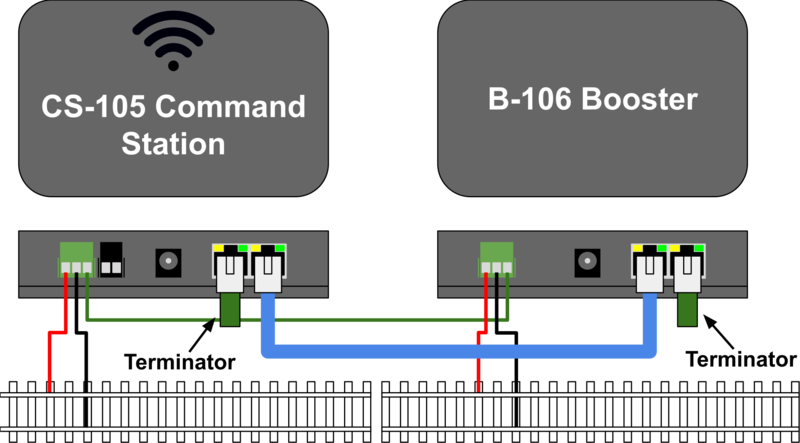
The track output is equipped with a soft-start mechanism to automatically limit the inrush current symptomatic of older first generation sound decoders. Additional external boosters may be added to the system for supplemental power, always be sure to include the booster common shown in the diagram below (green wire):

RailCom®
RailCom is a bi-directional data communications technology found in The NMRA Recommended Practices RP S-9.3.1 and S-9.3.2. RailCom enables bi-directional communication between the command station and decoders, unlike in traditional DCC where the communication is done exclusively in one direction (from the Command Station to the Decoder). The inclusion of RailCom opens up significant opportunities for future features and expansion. For example, the use of RailCom allows for real-time read-back of CVs while programming on the mainline. In traditional DCC, you would only be able to write to a CV, whereas with RailCom, writing and reading on the mainline are both possible.
Some other possibilities such as live feedback on a throttle for fuel/water level, temperature, and many other statistics are also unlocked with RailCom technology. Block detection becomes more integrated with RailCom as well, including the possibility of knowing who is occupying a block, rather than just knowing a block is occupied. This data could be used further to aide in automation setups and macros. A fleet of rolling stock could also be equipped with basic RailCom decoders to keep track of cars in yards or trains. The potential applications for RailCom are still being explored, and is an untapped wealth of possibilities! What will you do with RailCom and the B-106?
RailCom is a highly-responsive system as well, allowing up to ~126 individual operations per second (depending on the available DCC bandwidth) at a bitrate of 250Kbps by introducing a very brief interruption to the DCC track power. During this interruption, the RailCom detector on the Command Station will send or receive information to and from the decoder. Please refer to our online documentation on the TCS Wiki for more information on RailCom, including prerequisites, configuration options, and hardware support within TCS’ product lines. Support - RailCom®